This is extremely preliminary and will be replaced when I have more time.
First, it is preferable to have TWO Apple Silicon macs, in order to use macvdmtool. This can work from a regular Linux machine (unless the target is a MacBook Neo) but may not be as reliable and is not as well tested. In either case, the remainder of this guide will call the host machine that sends commands the “master” (regardless of whether it’s a Mac or a regular Linux PC) and the Mac being RE’d the “slave”.
Second, install Gravity Bootloader on the slave. The high level summary of the process is that we’re going to install a second copy of macOS and then install Gravity Bootloader as the boot object in this install.
Compile a copy of Gravity Bootloader, stick this somewhere on the slave’s primary macOS volume.
Retrieve the source code, making sure you specify
--recursive:git clone --recursive https://github.com/GravityLinux/bootloader.gitThen, compile it (you’ll need to install the rust toolchain and, possibly, an aarch64 cross compiler):
cd bootloader
make -j$(getconf _NPROCESSORS_ONLN)
The file you’re going to install is
build/m1n1.binCreate a new macOS container. This is a two step process where you shrink the running macOS container to create some free space, and then stick the new container in that free space. Side note: I usually just have an LLM do this for me.
First, find the APFS container your current macOS install lives in:
diskutil listYou want
/dev/disk0, the internal disk. It should look something like this:/dev/disk0 (internal, physical): #: TYPE NAME SIZE IDENTIFIER 0: GUID_partition_scheme *251.0 GB disk0 1: Apple_APFS_ISC Container disk1 524.3 MB disk0s1 2: Apple_APFS Container disk2 245.0 GB disk0s2 3: Apple_APFS_Recovery Container disk3 5.4 GB disk0s3Important: The name
disk1is NOT guaranteed to line up with the identifierdisk0s1. It does in this example, but as you’ll see in the example later on basically any combination is possible, includingdisk2being identified asdisk0s3anddisk3being identified asdisk0s2. These values may also change after reboot. Make sure you’re specifying the right identifiers.Next, shrink the existing macOS volume:
diskutil apfs resizeContainer DISK SIZEwhere
DISKis the identifier andSIZEis what you want the existing container’s total size to be, not the amount of free space you want. For me this command was:diskutil apfs resizeContainer disk0s2 200gFinally, create the new container in the free space you just made:
diskutil addPartition disk0s2 APFS NAME SIZEwhere
NAMEis an arbitrary name (you’ll need this later, your new volume will be mounted under/Volumes/NAME, so choose something you’ll remember) andSIZEis how big you want the new container to be (0bselects all free space).addPartitionplaces the new partition in the free space after the partition you name, so you pass it the samedisk0s2you just shrank, not the container. I used the command:diskutil addPartition disk0s2 APFS development 45gRun
diskutil listagain afterwards and you should see the secondApple_APFSpartition appear./dev/disk0 (internal, physical): #: TYPE NAME SIZE IDENTIFIER 0: GUID_partition_scheme *251.0 GB disk0 1: Apple_APFS_ISC Container disk1 524.3 MB disk0s1 2: Apple_APFS Container disk3 200.0 GB disk0s2 3: Apple_APFS Container disk2 45.0 GB disk0s3 4: Apple_APFS_Recovery Container disk4 5.4 GB disk0s4Note how the disk numbers don’t align with the identifier numbers here.
Fetch the macOS installer. The best way to do this is to run:
softwareupdate --fetch-full-installer --full-installer-version VERSIONwhere
VERSIONis 26.6.2 for any M4 or A18 Pro class Mac, or 27.0 for any M5 class Mac.Install macOS into the container you created, then reboot into that container to finish the installation process (Apple’s installer will do the reboots for you).
Boot into 1 True Recovery (1TR). We will eventually publish a more detailed guide on how to use 1TR, but for now we just have a description of what to do.
First, shut down the machine, ensure it’s fully powered off.
Second, press and hold the power button for 20 seconds. For all laptops, you should see “Continue holding to view startup options” and a few seconds later see “Loading startup options”. Once you see “Loading startup options” then you can release the power button. For all headless devices (ie, Mac Mini or Mac Studio) we recommend just holding for 20 seconds until you see the boot picker screen.
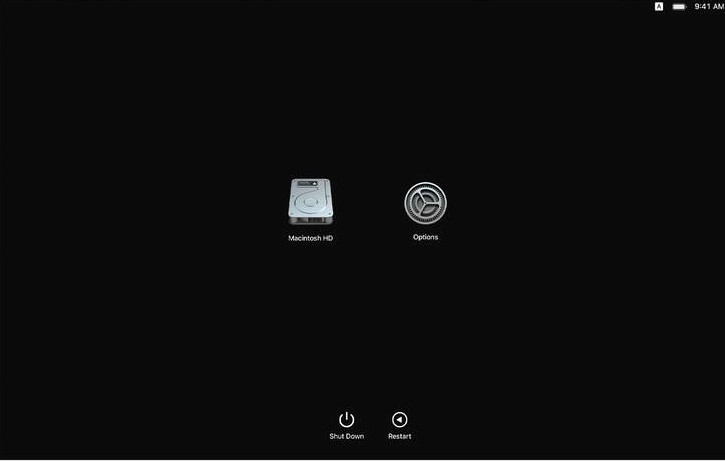
From the boot picker screen, select options, and enter your username and password of your primary macOS volume when prompted.
You are now in 1TR. Now, open a terminal from the top bar and run
bless --mount /Volumes/THE VOLUME YOU JUST CREATED HERE --setBootReboot the device again into 1TR.
First, enter permissive boot security so you can install custom objects:
bputil -nkasThis step will prompt you for a UUID, enter the UUID of the volume you just created. You can check the UUID of a volume using
bputil -d, you want the one that says Paired. You’ll need to enter the username and password of the secondary macOS volume.Then, install the actual bootloader object:
kmutil configure-boot \
     -v /Volumes/YOUR VOLUME HERE \
     -c /Volumes/PATH TO YOUR m1n1.bin OBJECT HERE \
     --raw \
     --entrypoint 2048 \
     --lowest-virtual-address 0
If successful, connect your master to any of the USB ports of the slave and reboot. You should boot into Gravity Bootloader.
Third, pop a shell and verify that the proxy works. From the master, first enumerate all devices and find the one corresponding to your device (MacBook Neo people have a different workflow):
ls /dev
On macOS, you should see something like /dev/cu.usbmodem followed by a serial number. I’m not sure what this looks like from a regular Linux machine.
From there you can run (after installing all required python packages):
M1N1DEVICE=/dev/cu.usbmodemSERIALNUMBER python3 proxyclient/tools/shell.py
If you get a Python shell, CONGRATULATIONS, IT WORKS! You’ve just taken your first (large) step into the world of Apple Silicon.
Do not worry if this process takes you a very long time. It took me months to fully iron out all the issues, and getting it working at all for the first time took weeks. I think this is a massive edge case, but the point is that this is a difficult process you should be proud of accomplishing!